Quickstarting a Mouf application with a database
The Mouf patcher system has been updated in the last month. In this blog post, we will see how to quickstart an application and set up easily a data model with some test data in it.
Installing Mouf and the database patcher
First step: let's get started with a Mouf application:
composer.json
{
  "autoload": {
    "psr-4": {
      "App\\": "src/"
    }
  },
  "require": {
    "mouf/mouf": "^2.0",
    "mouf/database.patcher": "^2.4"
  }
}
We install the "database.patch" package that enables database access and management of patches.
Next step is to install Mouf, as any Mouf install (visit http://localhost/yourapp/vendor/mouf/mouf)
Mouf will ask you to setup your database connection. Create a MySQL database using your favorite tool (PHPMyAdmin, MySQLWorkbench...) then enter the database credentials in Mouf installation screen:
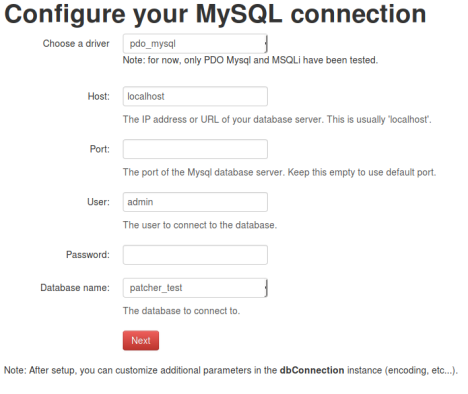
Done?
Creating the patch that creates the model
Mouf is now connected to your database. We will now fill it with the data model.
To do so, we will create a patch that creates your whole data model.
At this point you have 2 options:
Option 1: you already have a database model
If you already have a database model, you should export the SQL of your database using your favorite tool. Once done, click on the Utils > Patches management > Register a SQL patch menu. Copy/paste your database model in the patch. Done.
Option 2: you don't have a database model
If you are starting from a blank sheet, our advice will be to use a "DatabasePatch" that will create the schema using PHP code.
You do this?
- It is quick to write
- It generates a model that is compatible with all databases
Why not?
Avoid this if you use some features that are specific to one database only (like triggers or geo-spacial indexes).
To create the patch, click on the Utils > Patches management > Register a PHP migration class menu.
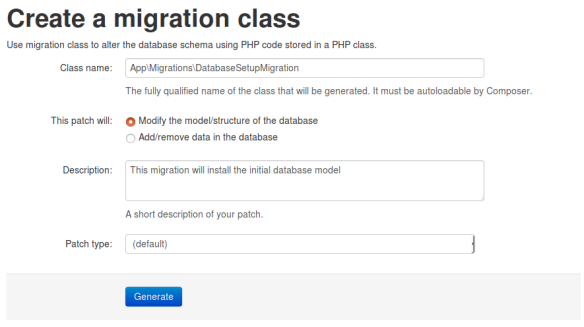
Here, we will create an App\Migrations\DatabaseSetupMigration class that will contain PHP code to apply the migration.
Let's edit some code to add a few tables:
src/Migrations/DatabaseSetupMigration.php
class DatabaseSetupMigration extends AbstractSchemaMigrationPatch
{
    public function up(Schema $schema) : void
    {
        $db = new FluidSchema($schema);

        $db->table('users')
            ->id() // Create an 'id' primary key that is an autoincremented integer
            ->column('login')->string(50)->unique()->then() // Create a login column with a "unique" index
            ->column('password')->string(50)->then()
            ->column('photo_url')->string(50)->null(); // Create a foreign key on the 'countries' table

        $db->table('roles')
            ->id() // Create an 'id' primary key that is an autoincremented integer
            ->column('name')->string(50)->unique(); // Create a foreign key on the 'countries' table


        $db->junctionTable('users', 'roles'); // Create a 'users_roles' junction table between 'users' and 'roles'.
    }

    public function down(Schema $schema) : void
    {
        // Code your migration cancellation code here.
        $schema->dropTable('users_roles');
        $schema->dropTable('users');
        $schema->dropTable('roles');
    }

    public function getDescription(): string
    {
        return 'This migration will install the initial database model';
    }
}
If you have a quick look at the "up" method, the parameter passed is a DBAL schema.
We wrap this schema in a FluidSchema object from the package thecodingmachine/dbal-fluid-schema-builder.
This is a small package that enables you to write a complete data model with a fluid syntax with a very (very) short syntax. It provides helper methods to quickly create foreign keys, indexes, jointure tables, etc... Have a look at the documentation here.
Applying the patch via the UI
Now, we can simply go to the patches page in Mouf, and apply the patch:
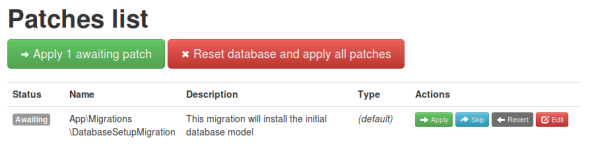
Click on the green "Apply 1 awaiting patch" and you are done!
Notice that you can click the ""Reset database and apply all patches" red button to drop the database, recreate the database and re-apply all the patches.
Alternative: applying the patch via the CLI
Alternatively, you can apply all the patches from the command line:
vendor/bin/mouf_console patches:apply-all
or if you want to reset the database and re-apply all the patches, you can use:
vendor/bin/mouf_console patches:reset
Generating some test data
Setting up the data model is nice, but what would be even nicer is to set up some test data. The test data should be applied on all development environement but not in production.
Mouf allows us to do this easily. As with the data model, we have 2 options.
We can either:
- create a SQL patch (with INSERT statements)
- or create a data migration patch.
Let's explore this second option.
To create the data patch, click on the Utils > Patches management > Register a PHP migration class menu.
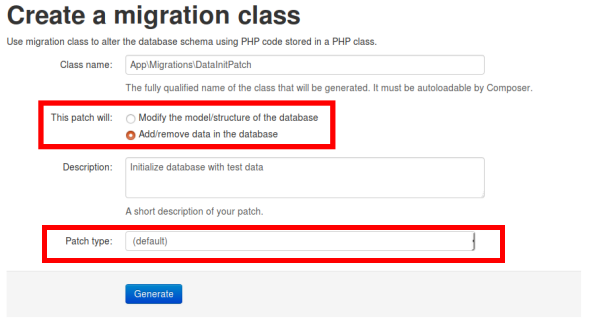
Notice how this time, we click on the "Add/remove data in the database" radio button. We also select the "test_data" patch type to tell Mouf this patch is to be applied only on test environments.
src/Migrations/DataInitPatch.php
``` class DataInitPatch extends AbstractDataMigrationPatch { public function up(Connection $connection) : void { $connection->insert('users', [ 'login' => 'admin', 'password' => 'someencryptedpassword' ]);
    $connection->insert('roles', [
        'name' => 'Administrators'
    ]);

    $connection->insert('users_roles', [
        'user_id' => '1',
        'role_id' => '1'
    ]);
}

public function down(Connection $connection) : void
{
    // Code your migration cancellation code here.
}

public function getDescription(): string
{
    return 'Initialize database with test data';
}
} ```
Generating massive test data
But what if you want to generate hundreds of users? We will improve this example by using the great faker library to generate test data.
composer.json
composer require fzaninotto/faker
Now, let's edit the up method of the DataInitPatch class.
``` $faker = \Faker\Factory::create();
// Let's seed the generator to generate always the same test data $faker->seed(1234);
// Let's add 100 more users with random logins for ($i=0; $i<100; $i++) { $connection->insert('users', [ 'login' => $faker->unique()->email, 'password' => 'someencryptedpassword' ]); } ```
And that's it! We generated 100 random rows for the "users" table.
Reseting the database and applying test data via the UI
We changed a patch that is already applied. We can simply reset the whole database and re-run all patches to apply the modified patch.
To do this, go to the patches page in Mouf, and click the reset button. You will see this page:
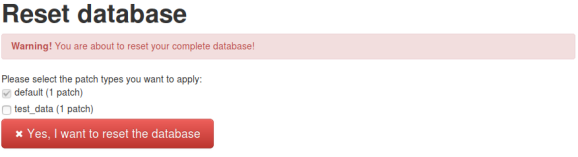
Here, you can select whether you want test data patches to be applied or not.
Reseting the database and applying test data via the CLI
Alternatively, you can use the CLI to reset the database and apply test data patches:
$ vendor/bin/mouf_console patches:reset --test_data
2 patches applied (default: 1, test_data: 1)
And that's it! In the coming months, we will add a new library to ease test data generation even further. Stay tuned!
- david's blog
- Log in to post comments
What’s new on Mouf :
- TDBM 5.0 is released 09/11/2017
- Quickstarting a Mouf appl... 15/06/2017
- Building beautiful datagr... 05/10/2016
- Official release of TDBM... 14/06/2016
- Announcing Mouf 2.1 first... 01/03/2016
- Mouf + Magento + PSR-7 =... 30/06/2015
- Standardizing the way we... 10/06/2015
- Container interoperabilit... 09/06/2015
- Container-interop + PSR7... 01/06/2015
- New in Mouf: a console! 19/05/2015