Writing a new controller
This is a quickstart guide to creating a new controller using the "Getting things done" package of Mouf. For a more complete documentation, read the Writing controllers documentation page from the Splash MVC framework.
Writing controllers is a 5 step processes summarized below:
- Create your controller class
- Create one or many views
- Purge the code cache
- Create the controller instance
- Purge the URL's cache
Create the controller class
Below is a sample class you can use as a model. It includes what you will most likely need:
- a template
- a logger
- an access to the TDBM factory (to access database)
The code below goes into the src/Test/Controllers/MyController.php file. It is important to respect that naming convention, as it is used by the class autoloader. If it seems strange to you, have a look at the PSR-0, and at the Composer autoload documentation.
<?php
namespace Test\Controllers;

use Test\Dao\DaoFactory;
use Mouf\Utils\Log\LogInterface;
use Mouf\Html\HtmlElement\HtmlBlock;
use Mouf\Html\Template\TemplateInterface;
use Mouf\Mvc\Splash\Controllers\Controller;

class MyController extends Controller {

    /**
     * The block receiving the content of the page.
     *
     * @var HtmlBlock
     */
    public $content;

    /**
     * The HTML template to use.
     *
     * @var TemplateInterface
     */
    public $template;

    /**
     * The logger
     *
     * @var LogInterface
     */
    public $log;

    /**
     * The utility class to access DAOs.
     *
     * @var DaoFactory
     */
    public $daoFactory;

    protected $echo;

    /**
     * This method will be called when we access the /helloworld URL.*
     * It accepts an optional "echo" parameter.
     *
     * @URL /helloworld
     */
    public function helloworld($echo = '') {
        // We store the $echo parameter in the controller.
        // We will access it from the view
        $this->echo = $echo;

        // Typical code to access database goes here.

        // We declare the view, and bind it to the "content" block.
        // The $this parameter means that in the view file, $this will refer to the controller.
        $this->content->addFile(__DIR__."/../../views/helloworld.php", $this);

        // Finally, we draw the template.
        $this->template->toHtml();
    }

    /**
     * Just echoing some text will output the text directly.
     * This is useful for Ajax calls.
     *
     * @URL /helloworld_ajax
     */
    public function helloworld2() {
        echo json_encode(array('hello'=>'world'));
    }
}
Note: there is absolutely no need to put your class in a "Controllers" namespace. You can put your class in whatever namespace you want, as long as Composer is aware of the top level namespace (aka the vendor-name).
Create a view
In this sample, we are loading a view named "helloworld.php". Let's write this file:
<?php /* @var $this Test\Controllers\MyController */ ?>
<h1>Hello world!</h1>
<p>echo: <?php echo $this->echo ?></p>
As you can see, $this in the view refers directly to the controller. We can access any members and any methods of the controller as long as they are public or protected. We cannot access private members from the view.
Purge code cache
Enough coding! We now have some configuration to do. The first step is to connect to Mouf UI, and purge the code cache. You should know the URL to Mouf now: http://[your-server]/[your-app]/vendor/mouf/mouf/
When you are logged, click the "Purge code cache" button.

We need to purge the code cache to be sure Mouf will rescan the filesystem and find our new class.
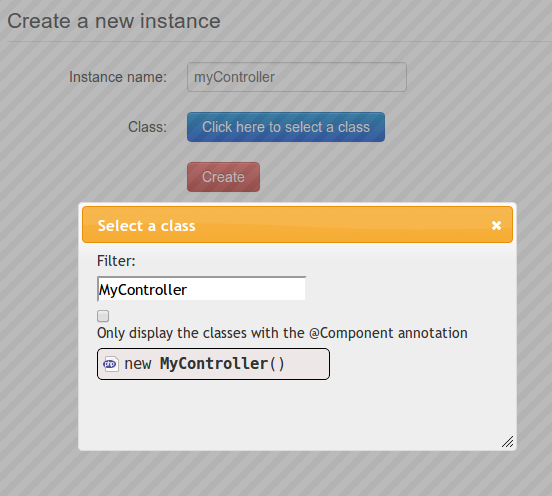
Declare the new instance
Click the "Instances > Create instance" menu.
Now, you need to select the "MyController" class, and give a name to your instance. By convention, we name the instance as the class, except put the name in camelCase. This is because an instance is quite similar to a variable name.
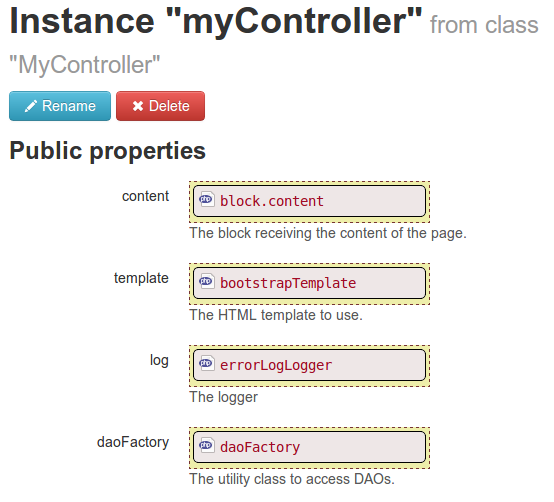
Once created, we need to bind the properties of the controller instance. By drag'n'dropping the template, the dao factory and the logger, you should arrive to this:
Purge the URL's cache
Last but not least, you need to purge the URL's cache. Splash MVC comes with a cache binding each URL to a controller and an action. Each time you modify a controller or an action parameter, you need to purge that cache.
The easiest way to do is to click the big red "Purge cache button":

And you are done!
You can now access your controller, by trying the URL: http://[server-name]/[app-name]/helloworld?echo=42
Found a typo? Something is wrong in this documentation? Just fork and edit it!