Druplash tutorial: how to build an application based on Drupal, using a MVC framework
Druplash is a MVC framework based on SplashMVC, that is directly integrated with Drupal. As a result, you can directly use an Object Oriented paradigm, with full MVC support inside your Drupal website.
Creating a controller
The first thing you will want to do in Druplash is to create your controller, to display a web page. If you are not familiar with Splash controllers, start by reading this page about Splash controllers.
Creating a controller in Druplash is similar to creating a controller in Splash:
- Step 1: Create the controller class, with the action
- Step 2: Create an instance of the class in Mouf
- Step 3: Clear Drupal's cache (only Step 3 is different, since it is Drupal's own cache that you must purge)
The controller class
Here is a sample controller class you might use:
<?php
namespace Test;

use Mouf\Html\HtmlElement\HtmlBlock;
use Mouf\Html\Template\TemplateInterface;
use Mouf\Mvc\Splash\Controllers\Controller;

class MyController extends Controller {

    /**
     *
     * @var HtmlBlock
     */
    public $content;

    /**
     *
     * @var TemplateInterface
     */
    public $template;

    protected $echo;

    /**
     * By calling the template's toHtml method, we render the content block
     * into Drupal's theme.
     *
     * @URL /helloworld
     */
    public function helloworld($echo = '') {
        $this->echo = $echo;
        $this->content->addFile(__DIR__."/../../views/helloworld.php", $this);
        $this->template->toHtml();
    }

    /**
     * Just echoing some text will not trigger Drupal's template rendering.
     * This is particularly useful for Ajax calls.
     *
     * @URL /helloworld_ajax
     */
    public function helloworld2() {
        echo json_encode(array('hello'=>'world'));
    }
}
If you have been using Splash, you will notice that the controller's code is exactly the same as the code from Splash. This means that you can use the same controller's code in Splash and in Druplash. Therefore, this means you can migrate a Splash application in Druplash without changing your code!
... yes, we know it's great :)
Of course, we need the "view" file associated with this controller.
helloworld.php
<?php
/* @var $this Test\MyController */
?>
<h1>Hello world!</h1>
<p>Echo: <?php echo $this->echo; ?>
Step 2: create an instance of the controller
So far, we have referenced the class in Mouf, but a class is useless if we do not create an instance of it.
- In the Mouf interface, click the "Instances / Create a new instance" menu
- Choose a name for your instance. For instance: "myController".
- Select your class in the drop-down (MyController)
- Click the "Create" button
Step 3: bind the instances
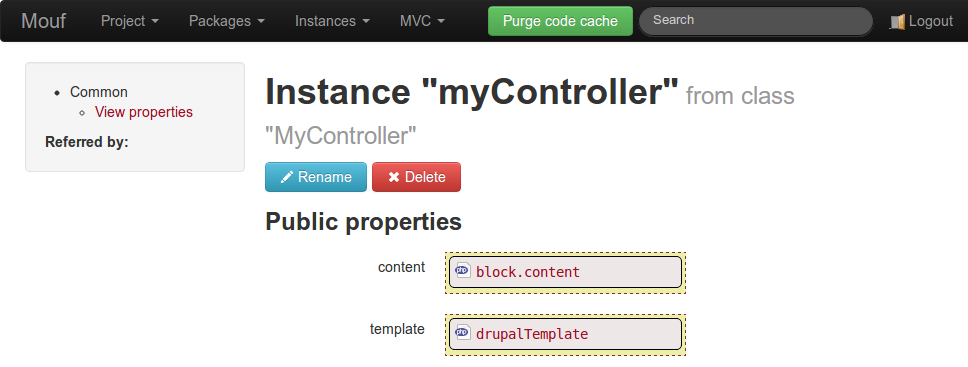
Now, we must fill the template and the content properties with instances.
- The template property should always be bound to the "drupalTemplate" instance. This instance represents the Drupal theme, and calling the toHtml() method of the "drupalTemplate" triggers the rendering of the Drupal theme.
- The content property should always be bound to the "block.content" instance. This instance represents the central part of your theme (where Drupal nodes are displayed).
After configuration, you should see something similar to this:
Step 4: clear Drupal's cache and test
Now, our instance is created. All that remains to do is to clear the Drupal cache (in the "Performance" section of Drupal admin).
Finally, we can test. Go to http://[server]/[drupal_directory]/helloworld?echo=42. You should see a page with "Hello world!" displayed.
Step 5: Setting the page title
In order to set the page title, you have 2 possible methods: using the setTitle method on the template, or using the @Title annotation in the controller.
Here is an example using the @Title annotation:
class HomeController extends Controller {
    ...

    /**
     * A sample page.
     *
     * @URL detailpage
     * @Title This is my page title.
     */
    public function details($id) {
        // Here is my page.
    }
}
And here is an example using the setTitle method:
class HomeController extends DrupalController {
    ...

    /**
     *
     * @var TemplateInterface
     */
    public $template;

    /**
     * A sample page.
     *
     * @URL detailpage
     */
    public function details($id) {
        $this->template->setTitle("My Title");
        // Here is my page.
    }
}
If you can choose between setTitle and @Title, please choose the annotation. Indeed, some blocks relying an the page title might be displayed before you enter in the controller's method. For instance, if you have a bread-crumb relying on the page's title, the @Title might be your only option, since the breadcrumb might be called before the setTitle function.
Step 6: overriding the Drupal Menu settings
Sometimes, you may want to set additional settings into Drupal's menu settings. To do so, there is a @DrupalMenuSettings annotation defined by a JSON object in value. The structure of the object will map the menu item structure :
    /**
     * @URL my/url
     * @Action
     * @DrupalMenuSettings{"type":"MENU_LOCAL_TASK","weight":10}
     */
    public function myAction($jour = null, $typeCollect = null, $fonction = null) {
        ...
    }
Example, you may want your Action to be represented as a drupal Tab. By default, the menu type is MENU_VISIBLE_IN_BREADCRUMB, that correponds to a simple URL. In order to get a Drupal tab for this actions, you should use a menu type MENU_LOCAL_TASK or MENU_DEFAULT_LOCAL_TASK.
Symfony HttpFoundation support
Since Druplash 7.3, support for Symfony HttpFoundation component has been added.
This means that Druplash will automatically inject a Request object into your action if your action expects a Request object
(just like the way it works in Symfony 2):
use Symfony\Component\HttpFoundation\Request;
...

/**
 * My action with the request object filled
 *
 * @URL /test
 * @param Request $request
 */
public function my_action(Request $request) {
    $param = $request->get('param');
    ...
}
Note: you should use the Request object instead of accessing directly $_FILES, $_SERVER, $_COOKIES, or HTTP headers.
You can also return a Symfony 2 Response object
Therefore, you can write things like:
<?php
use Symfony\Component\HttpFoundation\Response;
use Symfony\Component\HttpFoundation\JsonResponse;

class MyController extends Controller {

    /**
     * Returning a Response object
     *
     * @URL /myurl1
     */
    public function test1() {
         return new Response('Hello World', 200, array('content-type' => 'text/html'));
    }

    /**
     * Returning a JSON response
     *
     * @URL /myjsonurl
     */
    public function testJson() {
         return new JsonResponse({ "status" => "ok", "message" => "Hello world!" });
    }
}
?>
Typically, in Druplash, you will want to output the Drupal template object. You can easily output templates (or any object
implementing the HtmlElementInterface using the HtmlResponse object:
<?php
use Mouf\Mvc\Splash\HtmlResponse;

class MyController extends Controller {
    /**
     * @var DrupalTemplate
     */
    private $template;

    ...

    /**
     * Returning a Response object
     *
     * @URL /test_template
     */
    public function test1() {
        // do stuff
        return new HtmlResponse($this->template);
    }
}
?>
In the next tutorial
Le's move on to the next chapter, where we will learn how to write into Drupal blocks.
Found a typo? Something is wrong in this documentation? Just fork and edit it!